OCCAM Virtual Farms
Get a personal Virtual Farm to run your (MPI) application on OCCAM. The farm leverages the HTCondor batch system to launch jobs on a dedicated set of compute nodes.
Request a Virtual Farm for your team
After reading the next paragraph and understanding what it's all about... please contact the C3S personnel for more information and to request a new personal facility for your team:
We will be pleased to meet you for an informal conversation about your team's computing needs, to determine if the Virtual Farm framework is the most suited OCCAM's computing model to accomodate your requests.
Procedure to set-up a new Virtual Farm
The procedure to set-up a new farm comprises few steps, both on the user's and system administrator's side. The steps are the following:
- SYSADMIN: create user/tenant account on GitLab
- USER: upload the public RSA key to GitLab
- USER: create a base Docker image with custom runtime environment (i.e. you might need a specific MPI implementation or other libraries) and upload it to the GitLab registry
- SYSADMIN: set-up the Virtual Farm
The steps to be performed by the user are explained in more detail in the reminder of this documentation page.
Rationale
One of the challenges a scientific computing center has to face is to keep delivering a computational framework which is well consolidated within the community, such as the batch computing farm for non interactive processing, while adhering to modern computing paradigms. The goal is to ease system administration at all levels, from hardware to applications, and to provide a smooth end-user experience.
The underlying computing paradigm
In recent years, it has been shown by various large companies that encapsulating tasks into higher and higher layers of abstraction can provide a remarkable competitive advantage. The application’s architecture is no longer monolithic, whereas it is being factorized into multiple microservices, with great benefits in terms of flexibility and re-usability. This novel paradigm naturally fits in the CloudComputing model: a style of computing in which scalable and elastic IT-enabled capabilities are delivered as a service using Internet technologies. We usually think about Cloud Computing in terms of virtual machines. This still remains a good model for Infrastructure-as-a-Service (IaaS) provisioning, while it could be a too heavy and static approach to virtualization in the case of an application-focused deployment. This is particularly true in the casa of a HPC cluster, where the overhead introduced by full virtualization is to be avoided. Therefore, Linux containers have gained great popularity in recent times, since they provide a light-weight virtualization (the kernel is shared with the host) and allow to package and run distributed application components within the same platform across different environments.
We call Batch System as a Service (BSaaS) the strategy to automatically and dynamically deploy a complete batch system cluster, with appropriate user interfaces, in highly-available and scalable configurations. The end-user is provided with a cluster tailored to her needs, in terms of available software and configurations, easy to use and modify. On the other hand, while having (almost) full control on their own cluster, users are isolated from the rest of the system as not to disrupt other users’s work or the underlying infrastructure itself. In the next paragraphs we are going to explain how this goal is achieved, leveraging Linux containers and modern software components.
The BSaaS framework has been developed within the INDIGO-DataCloud project, funded by the European Commission’s Horizon 2020 Research and Innovation Programme.
Software stack
Mesos - Physical resources are administered with the Apache Mesos cluster manager. Mesos is built using the same principles as the Linux kernel, but at a different level of abstraction: it acts at a data-center level rather than at the operating system level. The Mesos kernel abstracts CPU, memory, storage and other resources away from physical or virtual machines and it schedules processes across the entire distributed infrastructure.
Marathon - In the context of a data-center level operating system, the Mesosphere Marathon application acts as an init system: it is designed to launch long-running applications. Marathon provides applications with high-availability, scaling and self-healing capabilities. Formally, Marathon is a Mesos framework, that is a set of master, scheduler and executor components designed to work in synergy with Mesos.
Calico - Network isolation is achieved with Project Calico. Calico is a layer 3 approach to data-center networking. It implements a virtual router on each compute node, which leverages the existing Linux kernel forwarding engine. Each router propagates the workload reachability information to the rest of the cluster using Border Gateway Protocol (BGP). Network policies can be enforced using ACLs on each compute node, to provide project isolation, security groups and external reachability constraints. Calico ACLs leverage the kernel firewall (iptables).
Docker - Application isolation (in terms of code, run-time, system tools and system libraries) is achieved with the Docker containerization platform. Docker containers are deployed using the Docker Containerizer module of Mesos.
HTCondor - HTCondor is the LRMS chosen to implement the BSaaS. Besides being open source and widely used in the scientific community, we chose HTCondor also because it’s cloud-aware. This means that this batch system is suited to work in a dynamic environment, where the list of worker nodes belonging to a cluster is not fixed. The HTCondor cluster is instantiated as a set of Marathon applications.
Architecture
The various HTCondor daemons needed to deploy a complete batch farm are packaged inside pre-configured Docker images and deployed as Long Running Services (LRS) through Marathon. This ensures fault-tolerance and scaling capabilities.
Each BSaaS instance is composed by three Marathon applications, sketched in the figure and described below.
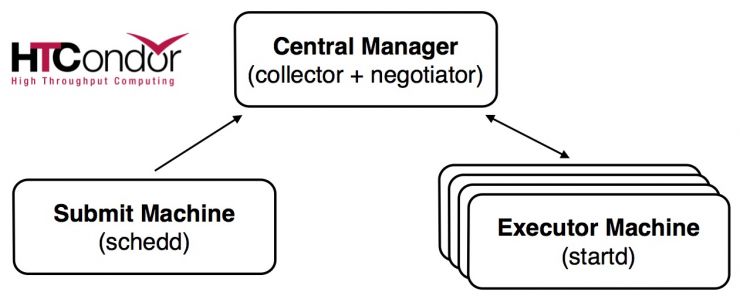
Central Manager - This application runs the HTCondor Collector and Negotiator daemons. The Collector is responsible for collecting the information about the pool status. All other daemons periodically send to the Collector ClassAd updates containing all the information about the state of the daemons, the resources they represent or resource requests in the pool. They also query the Collector for information required by their own operations.
The Negotiator is responsible for all the match making within the HTCondor system. Periodically, it queries the Collector for the current state of all the resources, it contacts the scheduling daemons that have waiting resource requests and tries to match available resources with those requests. The Negotiator is also responsible for enforcing user priorities in the system. Submitter and Executor operations are coordinated by the Central Manager.
Submitter - It acts as access node and runs the Schedd daemon. This daemon represents resource requests to the HTCondor pool and manages the job queue. It advertises the number of waiting jobs in its job queue and is responsible for claiming available resources to serve those requests. Once a job has been matched with a given resource, the Schedd spawns a daemon called CondorShadow to serve that particular request. The Submitter machine also runs the sshd daemon, to allow the end-user to log-in and submit jobs to the pool.
Executor - It runs the Startd daemon, which represents a given resource to the HTCondor pool, as a machine capable of running jobs. It advertises certain attributes about machines that are used to match it with pending resource requests.
All applications also run an instance of the HTCondor Master daemon, which is responsible for keeping all the other daemons running.
Bastion service
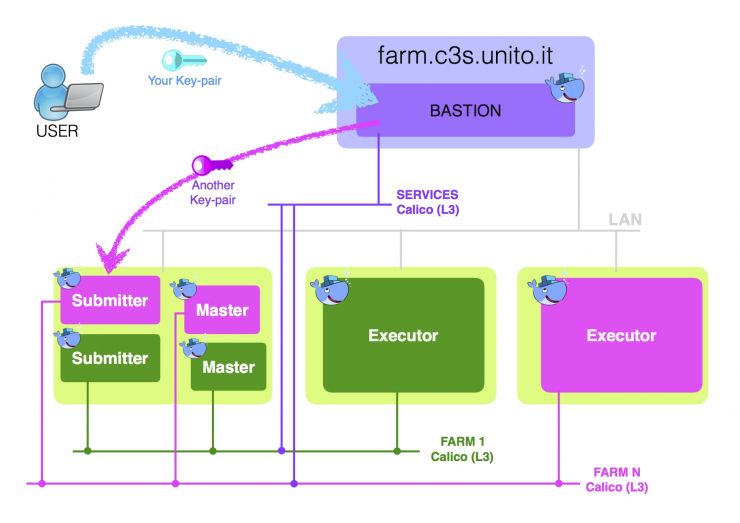
All the BSaaS instances run within a private network, to which end-users do not have direct access. The bastion service is a container running on one of the OCCAM front-end servers. It has two NICs: one one the public network and one on a dedicated Calico network, with proper ACLs to be able to communicate with each BSaaS cluster. The container runs an sshd daemon configured to forward each user’s request to the appropriate Submitter machine, with the help of a service discovery application (i.e. Mesos-DNS). The system architecture and access model are sketched in the figure below. The lilac area represents the front-end server, the light green areas the OCCAM physical nodes. Only one Executor per farm is shown.
Authentication
Authentication to the farm happens in two steps:
- users login to the front-end machine (the bastion service) with a custom RSA key-pair. The public key must be uploaded to the GitLab endpoint in order to be granted access to the personal farm.
- the connection is automatically redirected to the proper Submitter using a second pair of private/public keys. These are set-up by the system administrator and are used to login to all the instances of a single farm (i.e. the Executors).
GitLab repository and software management
C3S provides a private GitLab repository to store your (proprietary) software and custom Docker images. An account will be created for each of your team's members. A new group will also be created for the team (we sometimes refer to a team/group as a tenant).
In order to access the C3S GitLab, point your browser to:
Please change immediately the simple password provided to you upon account creation.
In order to access the GitLab endpoint via API (command-line) from your Virtual Farm or personal device, an RSA key-pair is needed. The same key-pair will also be used to login to the Virtual Farm. See the next section for instructions on how to generate and to upload your public key to GitLab.
In the C3S GitLab, you can create several software projects per user and share them among your group.
We strongly suggest to store your project's code on GitLab and to access it from within the farm via the git API: the repository is private, provides software versioning and resides on the same local network as your Virtual Farm. Alternatively, you can secure copy (scp, sftp) the code from an external machine to your farm.
Uploading your public key to GitLab
We suggest you generate a brand new pair of private/public RSA keys to be used on OCCAM exclusively. Indeed, as explained later, you will need to upload the private key to your farm in order to access GitLab from the farm itself, therefore it will be accessible to the farm administrators.
In order to generate a new key-pair:
ssh-keygen -t rsa -f occam_<your_username>
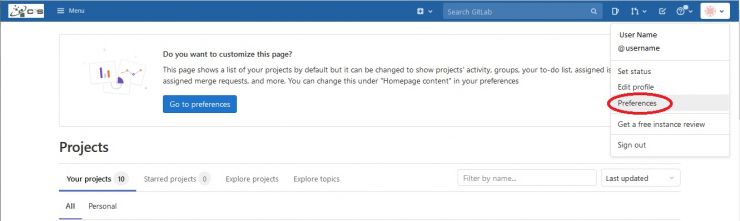
In order to upload it on GitLab, click on you avatar on the top right corner of your personal page. A drop-down menu will appear, from which you should select Preferences.
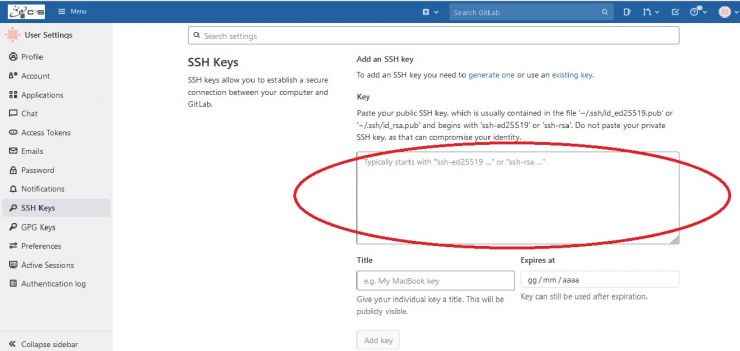
Choose the SSH Keys tab:

And copy and paste the public key:
Accessing GitLab from within the farm
In order to access GitLab from within the farm, you should copy the private key newly generated to your farm, at the location:
~/<your_username>/.ssh/occam_<your_username>
and make sure it hase the appropriate permissions:
chmod 600 ~/<your_username>/.ssh/occam_<your_username>
The ssh client has already been configured to use that key to connect to GitLab. Check-out the file:
goofy@mouseton-submitter$ cat ~/.ssh/config
# BEGIN ANSIBLE MANAGED BLOCK
Host 192.168.*
  StrictHostKeyChecking no
  UserKnownHostsFile=/dev/null


Host mouseton-submitter.marathon.occam-mesos
  StrictHostKeyChecking no
  UserKnownHostsFile=/dev/null


Host gitlab.c3s.unito.it
  RSAAuthentication yes
  IdentityFile ~/.ssh/occam_goofy
# END ANSIBLE MANAGED BLOCK
Feel free to edit this configuration file according to your needs, but mind:
- write outside the block ANSIBLE MANAGED BLOCK, or your configuration will be overwritten the next time the farm is re-created
- never overwrite the default id_rsa key, or you will no longer be able to access the farm Submitter and all its compute nodes
Preparing a custom environment
Software containers
In OCCAM, all user software runs in Linux containers. The container holds the full runtime environment needed for your computation: operating system, libraries, executables, files, except for the Linux kernel, which is shared with the physical host on which the container runs. The container also isolates your computations from the rest of the system. Each time you need to update the runtime environment, you should provide us with a new base image and we will re-create your Virtual Farm.
IMPORTANT: your project's software, which very likely will need to be tuned and modified on a regular basis, should not be placed in the container's image. Rather, it should be checked-out or secure copied to your farm's home directory once it has been set-up. User's home directories are persistent to farm re-creation and they are shared among all OCCAM nodes.
In OCCAM we currently use Docker containers. You can find the full documentation at the Docker site, but don't worry... you will need only very basic knowledge of it.
In order to build and upload the image, you will have to install Docker in your machine. Please download and install it from here. You can build and run Linux containers on MacOS, Windows or Linux, and they will run on OCCAM.
Jargon alert: what you will build and upload is not a container but an image. A container is a running instance of an image, more or less like a process is a running program.
The basic workflow to produce your base image is:
- create a GitLab project that will store all the artifacts needed to run your computation
- create (build) and test the image on your machine by writing a Dockerfile
- upload (push) the image on the private image registry located in your GitLab project (only images from our internal registry can be run on OCCAM)
In the following, you will be guided through these steps.
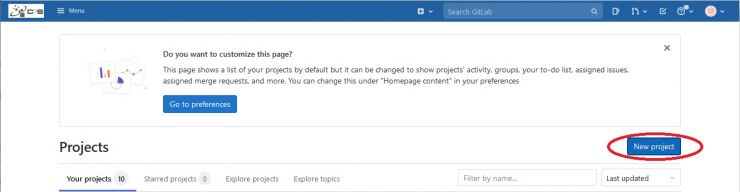
Create a project on GitLab
A project on GitLab is needed to store all the artifacts: your files, the Dockerfile and your container images. Only one container image per project is allowed, but you can use different tags. To create a new project, click on the New Project blue button:
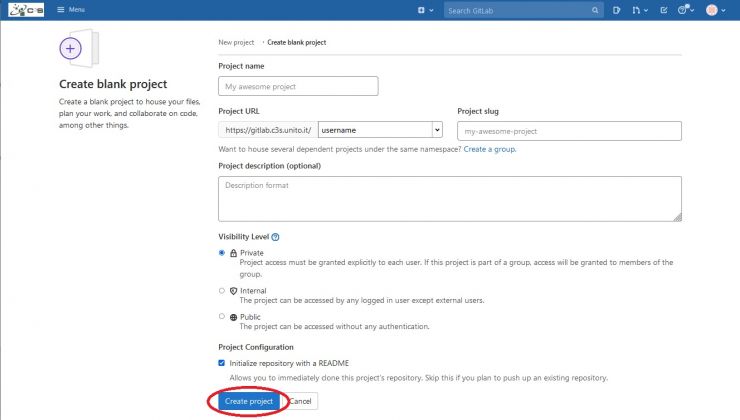
To create a new project, select Create blank project :
![]()
Choose a name for your project in the Project name field and click on the Create Project blue button at the bottom left of the page:
Building the image
Building an image means picking a base image and adding all the pieces and configurations needed to run your application, much like you would do on a new workstation. The base image typically contains just the operating system, but there exist images with preinstalled software. You can find official Docker images you can use as base images at the Docker Store.
If the Linux distribution is not important, we suggest to use CentOS 7. In general, we support EL out of the box. If you need to use another distribution, i.e. Debian, it can be done but it will require a little bit more time for us to set-up your farm.
Now you need to write a Dockerfile to instruct Docker on how to build your container. We provide an example here. In this example, the Dockerfile is provided and there is only one file, the Python script that computes a Mandelbrot set.
You can get both files (script and Dockerfile) by cloning the project's repository:
git clone :bagnasco/docker-example.git
cd docker-example
Take your time to inspect the Dockerfile before building. The full commands reference can be found here.
Now you are ready to build the image with:
docker build -t gitlab.c3s.unito.it:5000/<your_username>/<your_projectname> .
Note tat the last dot in the build command is important. Docker will start downloading the base image and then to execute step-by-step all the operations described in the Dockerfile.
You can use the command:
docker images
to see the newly-built image (as well as all other previously built images, if any).
To run the container:
docker run -ti --rm --volume $PWD:$PWD --workdir $PWD <your_username>/<your_projectname>
In this example, the software must read and write to the same directory from which the container is launched. The volume is exposed inside the container by the options:
--volume $PWD:$PWD --workdir $PWD
You can find the full reference to the docker run command here.
The output should be something like:
Computing...
Drawing...
Done.
and you should find a new file named mandelbrot.png in the current directory.
Uploading the image to OCCAM registry
An image registry is a store where the images can be pushed/pulled when needed. Every GitLb project owns a private registry. In order to run on OCCAM, you need to push the image to the OCCAM registry.
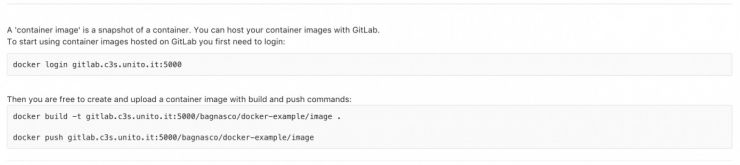
First you need to login to the GitLab repository, using your GitLab username and password:
docker login gitlab.c3s.unito.it:5000
You should see something like:
Username: <Enter you USERNAME on gitlab.c3s.unito.it>
Password: <Enter you PASSWORD on gitlab.c3s.unito.it>
Login Succeded
Then you can push the image with a name that includes the registry name:
docker push gitlab.c3s.unito.it:5000/<your_username>/<your_projectname>
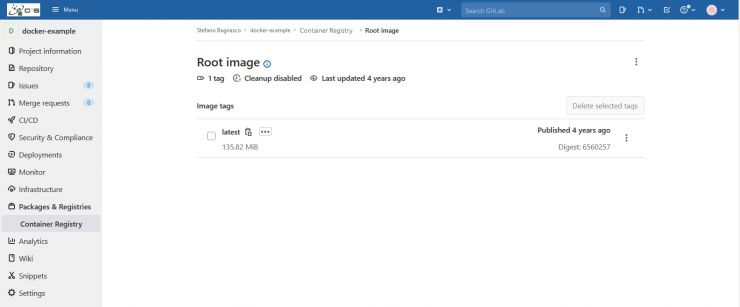
If everything went well, you can go to the registry page of your project:
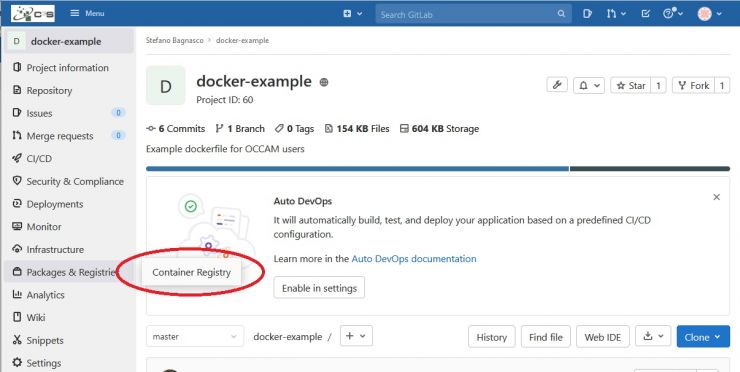
you'll find the root image of your project:
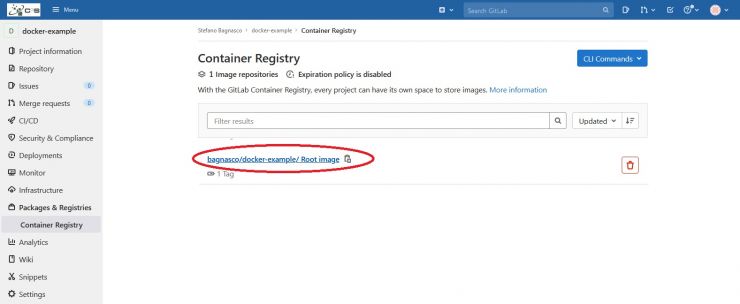
clicking on the Root Image link you'll see the new image entry. It will be named latest:
Some useful gitlab hints for this example project:
You can also add version tags to your containers like this:
push gitlab.c3s.unito.it:5000/<your_username>/<your_projectname>:v1
but the tag latest will always be an alias for the latest version built.
What do we do with your image?
The OCCAM administrators will further manipulate your base image to create the Virtual Farm. In summary we:
- change the root password (sorry for that)
- install and configure HTCondor
- expose the OCCAM persistent home directory to the container
- import users from the OCCAM LDAP server
The last two points have some consequences that you should keep in mind when creating the custom image:
- you will login to the farm with your GItLab username, as well as for the other users in your group. Therefore, there is no point in creating additional users in the base image itself
- do not place you project's software in some user's home directory, it will be overwritten by the persistent one
Additionally, remember that all of your team's users belong to the same Linux group. This can be useful in case you want to grant them, and only them, access to files in your home directory.
How to access the Virtual Farm
Once you receive a notification that the Virtual Farm has been created, you can login to the farm's Submitter like this:
ssh -i <your_private_key> <your_username>@farm.c3s.unito.it
and you will be redirected automatically to your private Submitter container.
For convenience, you can add few lines to the ssh configuration file on your local workstation:
goofy@mylaptop$ cat ~/.ssh/config

Host occam
Hostname farm.c3s.unito.it
UserKnownHostsFile /dev/null
StrictHostKeyChecking no
IdentityFile ~/.ssh/<your_private_key>
and connect simply by doing:
ssh occam
The private key is the one whose public counterpart has been uploaded to GitLab. The username is your GItLab username (note that your GitLab password cannot be used to login to the farm).
From the Submitter you can login to the Master container simply by doing:
ssh <tenantname>-master
it can be useful in case you want to inspect HTCondor log files. In this notation, <tenantname> is your group's name.
You can also login to the nodes by using their hostname or IP (more on this in the next section).
The home directory is exported to all the compute nodes.
HTCondor and MPI
In this section we are going to explain how to run a computation on your Virtual Farm. We would like to start with few considerations...
Why HTCondor? Do I really need to use it?
HTCondor is notably a complicated framework: it allows for fine-tuned configurations and advanced resource allocation policies. The first unsupervised approach to it can be puzzling... we know. But within OCCAM, we are using HTCondor merely to create a job pipeline. Indeed, advanced resource allocation policies are handled with different tools, as explained in the Rationale section. You will probably need to use HTCondor in order to submit your calculations in a batch-like fashion and it becomes particularly convenient if you have more than one user in your team who wants to submit jobs. This really depends on your specific needs. Nobody prevents you from running a simple script that enqueues jobs... your farm's resources are allocated to your tenant exclusively and at worst you will have to compete for them with other members of your team.
In particular, if you want to run an MPI application, we strongly suggest to test your MPI application in an interactive fashion first, using all the nodes available to your farm. This is to check that everything is working as expected before introducing an additional layer of complication. Once you have done this, we provide a simple example to get you going with HTCondor and MPI.
For a complete documentation on submitting HTCondor jobs you can start from:
Notice that for MPI jobs we use the:
Now, please check-out the HTCondor and MPI example, you will need it to go through the next steps of this tutorial.
Which resources are available to you?
Well, it depends on what we have agreed upon... In general you will have access to a Submitter and a certain number of compute nodes. The default set-up is described below. If you have some specific requirement, please contact the OCCAM Farm Administrators to see if it is possible to accomodate them.
At the moment only light nodes are allocated to the Virtual Farms: they count 2 CPUs with 12 cores each.
Submitter
If you check the number of cores available to the Submitter:
cat /proc/cpuinfo
you will see a large number... but they are not really available to you. Indeed, the Submitters of several Virtual Farms are running on the same physical node and each Submitter is allocated a share of 1 core. So don't be surprised if you see a very low efficiency when running a test job interactively on the Submitter machine.
Executors
Each Executor is allocated a complete physical node. Which means that your application will not compete with other applications running on the same physical host. This configuration is optimized for MPI applications. In this case, you will see a number of 48 cores because hyper-threading is enabled. On the compute nodes you really have a share of 48 cores. If hyper-threading is seriously inconvenient for your application, we can settle a different configuration for your compute nodes.
Each node is allocated 94 GB of memory.
To check which Executors are available to you, you can use the HTCondor command:
condor_status
below an example output:
Name               OpSys      Arch   State     Activity LoadAv Mem     ActvtyTime


slot1@81857b89622f LINUX      X86_64 Unclaimed Idle      0.000 128658  6+01:05:23
slot1@d59263daf2b7 LINUX      X86_64 Unclaimed Idle      0.000 128658  6+01:10:23
slot1@e0c54779f505 LINUX      X86_64 Unclaimed Idle      0.000 128658  6+01:05:15
                     Machines Owner Claimed Unclaimed Matched Preempting


        X86_64/LINUX        3     0       0         3       0          0


               Total        3     0       0         3       0          0
The Executor name is made up of two parts: slot1 followed by the container ID as given by Docker. The second is the Executor's hostname and you can use it to connect to that machine. For instance:
ssh 81857b89622f
Alternatively, you can use the script list_nodes.sh to get a list of IP addresses of your farm's compute nodes (it can be useful to run your MPI application without the help of HTCondor). Usage:
./list_nodes.sh <tenantname>
example output:
192.168.128.251
192.168.129.241
192.168.129.68
These addresses are on a private virtual network and are accessible only within your farm. Password-less connection to the nodes is already set-up.
Using the HTCondor command line interface, you can also display a custom set of node's properties. For example:
condor_status -af Name Cpus State
which in this case gives:
slot1@81857b89622f 48 Unclaimed
slot1@d59263daf2b7 48 Unclaimed
slot1@e0c54779f505 48 Unclaimed
HTCondor nodes are configured as partitionable, which means that each job can request a subset of the available cores on the node. For instance, in the HTCondor submitfile you can specify:
...
machine_count = 3
request_cpus = 4
...
with which you request 3 job slots with 4 cores each. HTCondor can allocate several job slots on the same compute node.
If you run the condor_status command after submitting a job with the above directives, you will see something like:
Name               OpSys      Arch   State     Activity LoadAv Mem     ActvtyTime


slot1@81857b89622f LINUX      X86_64 Unclaimed Idle      0.000 128530  9+19:46:28
slot1_1@81857b8962 LINUX      X86_64 Claimed   Busy      0.000  128  0+00:00:04
slot1@d59263daf2b7 LINUX      X86_64 Unclaimed Idle      0.000 128530  9+19:52:33
slot1_1@d59263daf2 LINUX      X86_64 Claimed   Busy      0.000  128  0+00:00:04
slot1@e0c54779f505 LINUX      X86_64 Unclaimed Idle      0.000 128530  0+00:00:04
slot1_1@e0c54779f5 LINUX      X86_64 Claimed   Busy      0.000  128  0+00:00:04
                     Machines Owner Claimed Unclaimed Matched Preempting


        X86_64/LINUX        6     0       3         3       0          0


               Total        6     0       3         3       0          0
and if you closer inspect the available resources:
goofy@mouseton-submitter$ condor_status -af name Cpus State
slot1@81857b89622f 44 Unclaimed
slot1@d59263daf2b7 44 Unclaimed
slot1@e0c54779f505 44 Unclaimed
slot1_1@81857b89622f 4 Claimed
slot1_1@d59263daf2b7 4 Claimed
slot1_1@e0c54779f505 4 Claimed
you will see that each node has been partitioned with a slot1_1 sub-slot counting exactly the number of cores you requested in the submitfile (4 cores). The remaining 44 cores per node are still available for further job processing. This is not necessarily a feature you might want to use to run your MPI application. You can also specify the size of the job slot to be the full capacity of the compute node (i.e. 48 cores). In this way also the host's memory will not be shared among different jobs.
Since claiming resources is time consuming, they are kept in the Claimed state for several minutes after your job completed, in order to wait for possible new jobs. If you wish to clean-up all the Claimed resources to start from scratch, you can use the script: vacate_hosts.sh. Note that it will only unclaim all resources which are in a Claimed state, but not remove running jobs. Nevertheless, if there are running jobs, they will be stopped. This script leverages the list_nodes.sh script to get the list of nodes. Alternatively, you can connect to a specific node and run the condor_vacate command.
Usage:
./vacate_hosts.sh <tenantname>
example output:
Warning: Permanently added '192.168.128.251' (ECDSA) to the list of known hosts.
Sent "Vacate-All-Claims" command to local startd
Warning: Permanently added '192.168.129.241' (ECDSA) to the list of known hosts.
Sent "Vacate-All-Claims" command to local startd
Warning: Permanently added '192.168.129.68' (ECDSA) to the list of known hosts.
Sent "Vacate-All-Claims" command to local start
Infiniband
All nodes are interconnected by an Infiniband fabric. Nevertheless, this functionality is not yet activated on the Virtual Farms. For the time being, the available connection is 10 Gbps Ethernet.
Running a test MPI job on HTCondor
We provide a dummy MPI program that prints the process number and the name of the host executing the job. The script is called mpitest.c. It will be replaced by your real MPI program. In order to produce the dummy executable:
make mpitest
Note that you might need to modify the path to your MPI compiler inside the Makefile:
...
MPICC?=/usr/lib64/openmpi/bin/mpicc
...
The script called openmpiscript is used by HTCondor to execute MPI jobs in the Parallel Universe. Please do not modify it unless you really know what you are doing. The only thing you might want to modify within the script is the location of your OpenMPI installation (the first uncommented line):
MPDIR=/lib64/openmpi/
The file called submitfile is a minimal example of steering file to submit HTCondor jobs using MPI. The lines you certainly need to modify are the full path to your MPI executable, which in this example is called mpitest:
# full path to executable
arguments = <your_path>/mpitest
the number of compute nodes you would like to use:
machine_count = 4
and the number of processors per node:
request_cpus = 48
When using the HTCondor Parallel Universe, as in our case, the argument executable should always be the openmpiscript:
...
# do not change the line below, unless you know what you are doing ;)
executable = openmpiscript
...
Submitting your job
It is as simple as typing:
condor_submit submitfile
Check the job processing status
The job processing status can be inspected with the command:
condor_q
example output:
-- Schedd: mouseton-submitter.marathon.occam-mesos : <192.168.128.17:46246?...
 ID      OWNER            SUBMITTED     RUN_TIME ST PRI SIZE CMD
   1.0   goofy            6/5  13:01   0+00:00:00 I  0   0.0  openmpiscript /arc
where the status I stands for idle: HTCondor is waiting for resources to be assigned to the job. The job status R stands for running.
Sometimes you can find your job stuck in state H, which stands for held. This means that the job was assigned a node for execution and for some reason the execution failed. This is most likely an error on your side, i.e. an input file missing is the most recurrent mistake.
If your job is stuck in state I, idle, this means that no suited resources can be found to run the job. In this case it can be useful to inspect the scheduling status with the command:
condor_q -analyse
with an example output:
-- Schedd: mouseton-submitter.marathon.occam-mesos : <192.168.128.17:46246?...
---
004.000:  Request is running.


User priority for goofy@* is not available, attempting to analyze without it.
---
005.000:  Run analysis summary.  Of 6 machines,
      3 are rejected by your job's requirements
      0 reject your job because of their own requirements
      3 match and are already running your jobs
      0 match but are serving other users
      0 are available to run your job
...
Remember that you can always login to the Master machine or to the individual nodes to inspect the HTCondor logfiles in:
/var/log/condor/
but in general this should not be necessary and we suggest to contact the OCCAM Farm Administrators if you suspect that something is really wrong with the HTCondor installation.
Transferring input/output files
By default jobs are executed on the compute nodes in the following location:
/var/lib/condor/execute/<some_path>
this folder is local to the worker node and you can always inspect your job progress by connecting to the given node.
In this case, you should provide HTCondor with a list of input files, needed by your computation, to be transferred to the remote node prior to job execution. This can be done in the submitfile with the following instruction:
...
transfer_input_files = <path_to_file>,<another_path_to_file>
...
Concerning output files, at the end of job execution by default HTCondor copies back to the Submitter the files specified in the following:
log = logfile
output = $(CLUSTER).out
error =  $(CLUSTER).err
The first file contains the HTCondor job execution statistics, the other two are the job standard output and error respectively.
The variable, called macro in HTCondor terminology, $(CLUSTER) is the job ID in the job identifier. Another macro is available: $(PROCESS). This is useful when you instruct HTCondor to submit several jobs within the same submitfile:
...
queue 40
...
in this case you are submitting 40 instances of the job, with process ID values that run from 0 to 39. For instance, if you inspect your jobs process status with the condor_q command, you will see:
ID      OWNER            SUBMITTED     RUN_TIME ST PRI SIZE CMD
   2.0   goofy           6/5  12:42   0+00:00:00 I  0   0.0  openmpiscript /arc
   2.1   goofy           6/5  12:42   0+00:00:00 I  0   0.0  openmpiscript /arc
   2.2   goofy           6/5  12:42   0+00:00:00 I  0   0.0  openmpiscript /arc
   2.3   goofy           6/5  12:42   0+00:00:00 I  0   0.0  openmpiscript /arc
   2.4   goofy           6/5  12:42   0+00:00:00 I  0   0.0  openmpiscript /arc
   2.5   goofy           6/5  12:42   0+00:00:00 I  0   0.0  openmpiscript /arc
...
Where, in the job ID column the number 2 is $(CLUSTER) and the numbers form 0 to 5 in this example are $(PROCESS). This information can be used in the submitfile to specify different output directories for different jobs.
If you need some additional output file to be copied back, and you will certainly do, this should be specified with:
transfer_output_files = <path_to_file>,<another_path_to_file>
should_transfer_files = yes
when_to_transfer_output = on_exit
Alternatively, you can specify the initial directory for the job execution to be located in your home directory, which is exported to all nodes. In this case, the output files will be accessible directly on the Submitter while they are being written:
...
initialdir = run$(PROCESS)
...
Note that all directories should already be present in the filesystem. This can be achieved for instance by wrapping the submitfile in a script that creates the needed folders first.
IMPORTANT: users of the same farm are sharing the same queue, then if you plan to use the command:
condor_rm -all
you will remove from the condor queue ALL the jobs running of ALL the users who share the querue (a.e. for the PLUTO1 farm, condor_rm -all will remove all the jobs of all the PLUTO1 users).
Please use instead condor_q command to show the jobs in the queue:
ID      OWNER            SUBMITTED     RUN_TIME ST PRI SIZE CMD
   2.0   goofy           6/5  12:42   0+00:00:00 I  0   0.0  openmpiscript /arc
   2.1   goofy           6/5  12:42   0+00:00:00 I  0   0.0  openmpiscript /arc
then, use the condor_rm command to remove a specific job from the queue,
condor_rm ID.number